Google Chrome suddenly crashes on my Windows 10 computer, why is that? This is one of the most common questions users ask me soon after upgrading to Windows 10.
When you see the following error screen, it means that the Chrome is crashed —
“Aw, Snap!
Something went wrong while displaying this webpage.
To continue, press Reload to go to another page.”
When a popular browser like Google Chrome keeps crashing on Windows 10 randomly, it can be really annoying.
No doubt Windows 10 got all new features, but some applications like Google Chrome that seamlessly worked on the previous Windows editions, are having issues with Windows 10.
Sometimes, it’s just the software conflicting with the system files, and other times it can be a major compatibility issue.
Chrome Crashes on Windows 10? Here’s How to Fix
Whatever may be the reason, if you’re a regular Internet user and Chrome is your best browser app , then you need to do something to stop the random crashing of Chrome on Windows 10.
In this guide, we’ll be discussing the best possible ways to fix the Google Chrome crashing problem in Windows 10.
1. Switch to 32-bit Google Chrome
If Google Chrome is crashing or isn’t responding at all, it can be due to the 64-bit version of Chrome. Many users with 64-bit Google Chrome have experienced the crashing problem. When they switched to the 32-bit Google Chrome, the problem of crashing or freezing was surprisingly gone.
If you’re also using the 64-bit Google Chrome and experiencing the freezing or crashing issues, here’s how to uninstall the 64-bit Chrome and install the 32-bit version.
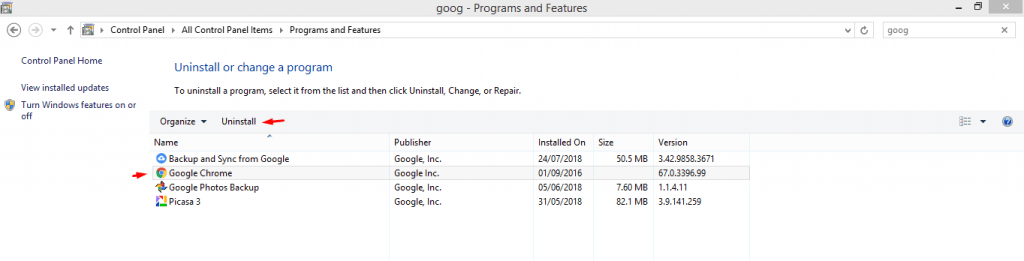
Uninstalling the 64-bit version of Google Chrome:
- Go to the Control Panel on your Windows 10
- Select the Programs and Features option
- In the new window, search for Google Chrome
- Right-click the application and select ‘ Uninstall ’ from the options
Installing the 32-bit version of Google Chrome:
- Download the Google Chrome 32-bit installer here
- Once the download is complete, open the file location and double-click on the installer
- Follow the steps to complete the installation process
Reinstalling your Chrome actually works most of the time. However, if it doesn’t fix the problem, you’ll need to to try out the methods we have listed below.
2. Keep Chrome Out of the Sandbox-ed State
Sandbox is a special security feature in Google Chrome. The sandbox allows your browser to run applications that are potentially suspicious, but in a completely isolated environment so these suspicious apps won’t affect your computer.
Sometimes the advanced features like sandbox can cause the Chrome to crash on Windows 10 PC. For security purposes, the sandbox insists the browser to crash.
While that sounds strange, Chrome’s sandbox feature has done this on earlier versions of Windows as well.
If you are unable to run a 64-bit version of Google Chrome on Windows 10, you need to disable the sandbox.
- Go to your Windows 10 desktop
- Right-click on the Google Chrome shortcut/icon
- Select ‘ Properties ’ from the drop-down menu
- In the Properties window, find the tab for Shortcut
- Open the tab (which is on the top side)
- Select the Target field
- Click on the text section
- Press the Space key only one time at the end of the text
-
After space, type this -
-no-sandbox
- Click on OK and Apply to save the changes
Hereon, Chrome will not crash on Windows 10.
Unfortunately, when you disable the sandbox in Chrome, your browser becomes more prone to security attacks. Instead, you can go with solution #1 and run a 32-bit version of Google Chrome on Windows 10 or try other methods given below.
3. Switch to a New User Profile
For some unknown reason, this method works to solve your crashing problems in Chrome. Follow the steps below to add a new user.
- Open Google Chrome
- Go to Settings
- Now, under the People section, hit the Manage other people icon
- Click Add Person
- Give a title to the new user and tap on the Add button
Now, restart your Chrome and use it with the new user profile. Your Google Chrome might now work properly with a new user account.
4. Close Other Tabs in Chrome
Opening multiple tabs can overload your Chrome and result into crashing. It’s a good practice to close the unwanted tabs and remove redundant extensions so that the tabs you’re working on can keep running smoothly.
- Close all the tabs in Chrome
- Now, close your browser and restart Google Chrome
- Launch your webpage and check if your Chrome behaves properly
You also have to toggle all the extension off from your browser. To do so,
- In your Chrome Browser, enter the following URL -
chrome://extensions
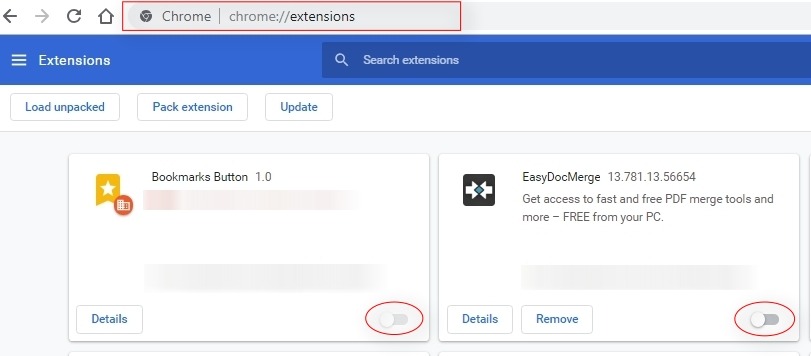
- All the extensions in your browser are listed
- To disable the extensions, toggle the slider to OFF
Once it is done, restart Chrome, and see if it crashes again.
5. Update the Drivers
If the above steps don’t work for you, try updating the outdated or missing devices drivers on your Windows 10 computer.
To update the device drivers by going to the manufacturer’s website and search and install the latest drivers that are compatible with your operating system.
You can also use driver updater tools to automatically check and update the device drivers.
6. Check for Faulty Applications and Programs
If your Chrome suddenly starts to crash after you have recently installed an application, the newly added problem might be at fault. To check those incompatible programs, follow the steps mentioned below.
- Enter the following URL in your Chrome address bar
“chrome://conflicts.”
- Hit the Settings icon
- Click Advanced
- Under the Reset and Cleanup button, tap on Update or remove the incompatible application
- A list of application/s appears on the page that is incompatible with Chrome.
Hit the Remove button and done, the application is removed. Once again, reboot Chrome and you may now see your browser work correctly.
7. Run an Antivirus Scan
Oftentimes viruses on the computer target specific application, which causes the program to stop working. Your PC deals with many viruses on a daily basis and some advanced virus infections can go overlooked by the inbuilt virus scanner.
To make sure your PC is completely clean, try the antivirus tools. If the antivirus detects any malware, follow the instructions on screen by your antivirus clean it up. Once the scan is complete and you’ve successfully cleaned your computer, restart the system.
Now, open Chrome and see if this has fixed crashing issues.
8. Use System File Checker
Last but not least, you can use SFC Scannow function to fix the Chrome crashing problem on Windows 10.
SFC (System File Checker) is an excellent tool in Windows that scans for any corrupt system files and also repairs. Here’s how to do it:
- Go to the Windows search bar and type cmd
- Now, right-click on the Command Prompt icon and select Run as admin
- Hit the Yes button to confirm
- In the Command Prompt window, type sfc / scannow and hit the Enter button
- The tool itself finds for any errors and fixes any issues that are detected
As the process is complete, close the Command Prompt window and see if your Google Chrome crashes again.
Great! Your Google Chrome crashing problem is likely to resolve using the above methods. Have any other issues with your Chrome browser? Let us know your doubts and queries in the comments section below.
Read Next:
- How to Make Chrome Faster? (15+ Actionable Ways)
- Fix: ERR_CACHE_MISS Error in Google Chrome
- Easy Steps to Fix “Google Chrome Has Stopped Working” Error
Yopie
January 30, 2019 at 8:35 amthankyou so much, 100% works on my pc 🙂
DTP Editor
January 31, 2019 at 6:37 amHey Yopie, glad this post helped you fix Google Chrome crashing problem. It would be great if you share this post on your Facebook.
Keep coming back for more helpful guides and tutorials.