Windows 10 is one of the most popular and widely used operating systems. With so many advanced features, many users report issues with Windows 10 nearly every day. “ No Sound on Windows 10 ” is the most common amongst them.
There can be many reasons why the speakers are not working on your Windows 10 computer. Sometimes it’s just due to the connection problem or outdated drivers.
In this guide, we’ll discover the most common reasons for no sound on your Windows 1o computer and the ways to fix the audio issues.
1. Check Sound Settings, Cables, and Volume
That’s right!! It’s always better to check the basics before moving on to any other method. So, remember to check out the speaker connections, plugs, audio cables, headphone connections, and other audio connections.
Quick-and-Basic Checks:
- Check out the power and volume levels from the audio icon. (You may also choose to turn all the volume controls up)
- It always makes sense to check out for any loose cables or the wrong jack, and even try to connect to a different USB
- In the case, you are using some speakers or apps that are equipped with their own volume controls - check them up as well
- Are your headphones plugged in ? Then, the speakers may not work properly, so remember to unplug and then check
After performing the basic checks, if the Windows 10 no sound issue still exists then you may try some of the methods described below.
2. Try Running the Audio Troubleshooter
The built-in audio troubleshooter is yet another must-try method. You may consider running the audio troubleshooter, which will help in identifying and fixing issues.
Here’s how:
- Select the Start button, key in audio troubleshooter in the search box .
- Now, select Find and fix audio playback problems .
- In the window that appears, click the Next
The troubleshooter will start checking the various services and then give you a list of results. In the case, the troubleshooter is not very helpful you may opt for other methods.
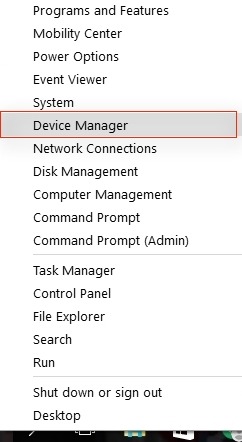
3. Use Device Manager to Fix Windows 10 Audio Not Working
One of the top reasons for audio not working could be attributed to Windows 10 audio driver issues. So, it is would be prudent to have the sound card running with updated drivers. And, here’s what you could do:
- Go to the Windows Start button and key in Device Manager in the search box, and click the option
- In the Device Manager window that appears, find your sound card under Sound, video and game controllers
- Now, select the Driver tab, and then select Update Driver
Note: In the case, Windows doesn’t find a new driver, then go to the official device manufacturer’s website and look for the new driver and follow the given instructions.
If you find this not working, then try the uninstalling and reinstalling the driver.
Here’s how:
- Uninstall the audio driver via the Device Manager . (Right-click the audio driver and choose Uninstall )
- Restart your PC
- As your Windows PC restarts, it will try and reinstall the driver
Alternatively, you can try the following:
- Open Device Manager
- Right-click your audio driver (Try Update driver > Browse my computer for driver software > Let me pick from a list of device drivers on my computer.
- Next, choose High Definition Audio Device and then click on Next . Check out the instructions given and follow them.
Now, you may find the Windows 10 audio not working issue resolved. If the issue still exists, then try some of these other methods. You can also use driver updater tools to automatically update the drivers.
4. Roll Back Audio Drivers
At times you may find that your Windows 10 PC faces audio glitches due to wrong driver configuration. In such a case, you may wish to try to roll back the audio drivers to the last good configuration.
Here’s what you can do:
- Go to the Start button and key in Device Manager .
- In the Device Manager window that appears, find your sound card under Sound, video and game controllers .
- Now, select the Driver tab, and then select Uninstall (if available).
And, you will find Windows 10 rolling back to the previously installed driver.
Note: In the case, the Roll Back Driver option isn’t available, and then you can try the Update and Reinstall the driver option described in one of the above methods.
5. Try Using Set Default as Device
Whilst facing the ‘no sound on computers Windows 10’ issue - try using the Set Default device option. So, in the case, you are using a USB or HDMI to connect to an audio device then you would need to set that particular device as the default. Here’s how:
- Go to the Start button, and key in Sound in the search box.
- Select the Sound option from the list of results.
- In the Sound window that appears, go to the Playback tab, select the device in question, right-click and choose Set as Default Device from the drop-down menu.
6. Disable (Turn off) Audio Enhancements
The Windows 10 Audio Enhancements are inbuilt packages (Microsoft and third-party) that are designed to ensure the perfect functioning of some of your PC’s audio hardware.
You may just try and turn off these enhancements as a precautionary check to find if they are the root cause. So, how to turn them off? Try the following steps:
- In the Start menu, key in Sound in the search box.
- Select Sound from the list of options.
- In the Sound window that appears, on the Playback tab, right-click the default device, and choose the Properties
- On the Enhancements tab, choose the Disable all enhancements checkbox. (Now, try to play your audio device).
- In the case, you find that the audio device is still not functioning then you can choose Cancel .
Now, repeat the process of disabling all enhancements for another default device and check the audio again. And, repeat the process for each default device.
7. Choose the Correct Audio Playback Setting and Test
As you are troubleshooting the audio issues - here’s another method which can help resolve the no sound on Windows 10 issue. Try changing the setting and use the Test button, here’s how:
- Go to the Start button , and type Sound in the search box.
- Select Sound option from the list of results.
- In the Sound window that appears, go to the Playback tab, and select the default device
- Now, right-click and select Properties from the drop-down menu
- Next, go to the Advanced tab, and under default format , choose a listed Setting and change the setting and hit the Test (Now, check if the audio is working).
- Repeat the process with other setting options.
And, that’s it! You may find that the changed setting helps in resolving the audio issue.
8. Try Updating IDT High Definition Audio CODEC
At times, systems may have issues with their IDT High Definition Audio CODEC. So, fixing this with a manual driver update could fix this glitch. Here’s how:
- Go to the Start menu, and key in Device Manager .
- Select Device Manager option from the list of results.
- In the Device Manager window that appears, look for Sound, video and game controllers and expand the option
- In the case, you find IDT High Definition Audio CODEC option , right-click and choose Update Driver Software .
- Also, in the next panel, select Browse my computer for driver software , and then select Let me pick from a list of device drivers on my computer , which will enable you to select from any of the pre-installed drivers on your PC.
- And, under Model , you can select High Definition Audio Device, and then select Next and choose Yes . Now, restart your system so that the changes can take effect.
9. Try Fixing Realtek Audio
You may have not faced any issues with Realtek drivers, but for users who have faced some audio problems attributed to Realtek audio, here’s what you can do:
A] Update Drivers
Do you already have the latest Realtek WLAN drivers installed? We understand the scenario, but you can still consider uninstalling and reinstalling the latest version. Here’s how:
- Visit the Realtek official website and download the latest version for your system.
- Go to the Start menu and key in Device manager.
- Select Device Manager from the list of results.
- In the window that appears, look for Realtek Wireless LAN drivers and choose Uninstall by right-clicking.
- Next, extract the folder that you downloaded, and look for the . exe file and just follow the given instructions.
- Restart your system.
B] Alternatively, you may try disabling front jack detection within the Realtek HD Audio Manager. And, this method is worth checking out to fix the Windows 10 no sound issue.
10. Try Restarting Audio Services
At times audio services can get disabled, and in this case, it may need to be restarted. Here’s what you can do:
- In the Start menu search box, key in Services and hit Enter .
- Now, look out for Windows Audio and check the Status .
- In the case the service has stopped, you may choose to restart the service by double-clicking and selecting Start .
- Also, remember to check up the service start-up type, which should be Automatic by default. In the case, it is Automatic (delayed start), Manual, or Disable - remember to change the start-up type.
11. Update the Registry
Caution: It is prudent to create a backup before you decide to make any changes in the registry.
Now, you can try and fix the problem by updating the registry. Here’s what you can do:
- Press Windows key + R .
- Enter regedit and click Ok .
- After confirming that the app can make changes to your user account. You can go to the Registry Editor window, and go to
HKEY_LOCAL_MACHINE\SYSTEM\CurrentControlSet\Control\Class
- Look for LowerFilter having value sys
- Look for DWORD and remove LVUSBSta.sys as the value data, which may resolve the issue
Note: DWORD may be hidden, so you may consider using the search feature.
- Also, go to HKEY_LOCAL_MACHINE\SYSTEM\CurrentControlSet\Control\Class\{4D36E96C-E325-11CE-BFC1-08002BE10318}\
- And, edit the Upperfilters by removing sys from the DWORD Value data field.
12. Try Restore from a System Restore Point
In case the problem still persists, you can restore from the system restore point and check if the sound problem gets fixed. Here’s what you can try:
- Go to Start button and key in Control Panel , and choose it from the list of results.
- In the Control Panel search box, key in recovery .
- Now select Recovery > Open System Restore > Next .
- You can select the recent app, driver, or update from the results shown
- And, then select Scan for affected programs
- You will be prompted with the list of items that would get deleted in the case, you decided to remove the restore point. And, if you are fine with it, then select Next > Finish
Note: At times, you may not see restore points which imply that the system protection isn’t turned on. To Turn on system protection, you can go to Control Panel, search for recovery and select Recovery > Configure System Restore > Configure.
Now resolving the no sound on Windows 10 issue would be easy by simply trying out the described methods. We would also like to hear from you in the Comments Box below on the methods, which has helped you resolve the issue.
Also Read:
- No Sound on Computer? Here’s How to Get it Back (Windows 10/8/7)
- 4 ways to fix “No Audio Output Device is Installed” Error in Windows 10/8/7
- Easy Methods to Fix ‘No Sound on Mac’ Issue