

5 Easy Ways to Fix High CPU Usage by Tiworker.exe in Windows 10
There five different ways to fix your computer suffering from high CPU usage caused by Tiworker.exe file.
The Tiworker.exe file causes high CPU usage as it is Windows Modules Installer process. You can avoid the process to consume your CPU by trying out the following solutions.
1. Check for Windows Updates
To reduce Tiworker.exe’s high CPU usage in Windows 10, you need to be sure that your Windows programs are completely updated.
You can fix the high CPU usage problem by manually checking for updates. If there are updates available, you need to install them.
- Go to the Control Panel on your Windows 10
- Click on it and open the Control Panel window
- In the Control Panel window, click on the “ Check for Updates ” option from the left pane
- Select all updates from the list
- Click on Install
- Click on OK when installation gets finished
Now, restart your computer and run the Tiworker.exe file to check the CPU usage.
Tiworker.exe file’s high CPU usage can be lowered by running Windows 10 updates systematically after regular intervals.
2. Repair Corrupt Files
Tiworker.exe’s high CPU and disk usage results from file corruption. You need to scan your Windows 10 computer to check for corrupt files. You should repair the corrupt files immediately.
Use online tools or download software for repairing the corrupt files. These tools will only repair corrupt files with minor issues.
If your corrupted files can’t be repaired, you can execute a System File Checker (SFC) scan offered by Microsoft for all Windows 10 users.
3. Run an SFC Scan
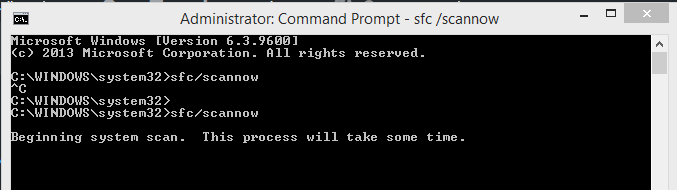
Scanning your computer for damaged files or malware can considerably lower the high CPU usage caused by Tiworker.exe file.
You can run a System File Checker scan regularly and solve this problem.
To run an SFC scan,
- Click on the search box next to Start menu on Windows 10
- Type “ cmd ” and press the Enter key
- Select the Command Prompt program from the search list
- Right-click on it and select Run as Administrator to open the Command Prompt window
- Type the following command – sfc/scannow
- Press the Enter key to initiate the scanning process
The SFC scan takes an hour or half to complete. After it finishes, your computer notifies you with two messages.
It will either be that Windows Resource Protection did not find any corrupt files. Otherwise, you’ll get a message saying – Windows Resource Protection Found Corrupt Files .
- Now, in the same Command Prompt window, type the following: Dism/Online/Cleanup-Image/RestoreHealth
- Press the Enter key
The cleanup operation begins, and the corrupted files get repaired. Once the cleanup is complete, reboot your PC and test if Tiworker.exe is still using high CPU memory.
4. Carry Out System Maintenance
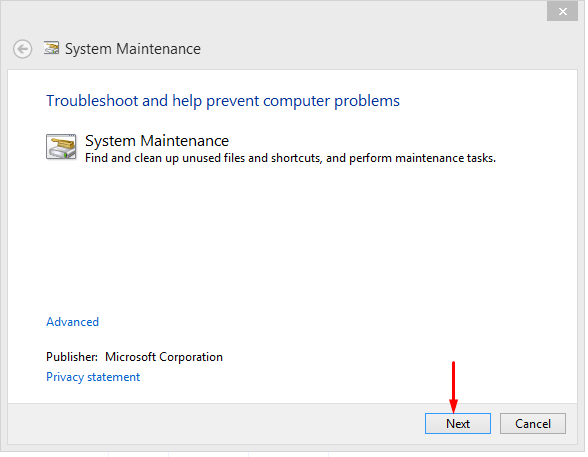
Your system can get infected with the Tiworker.exe virus. You need to run System Maintenance process to avoid such threats.
- Open the Control Panel program from Windows 10 Start menu
- On the left pane of the Control Panel window, choose the option – Find and Fix Problems
- Click on View All
- Open System Maintenance program
- Click on “ Next ”
Your system runs a standard maintenance process that detects any Tiworker.exe virus, and automatically removes it.
5. Consider Clean Booting Your PC
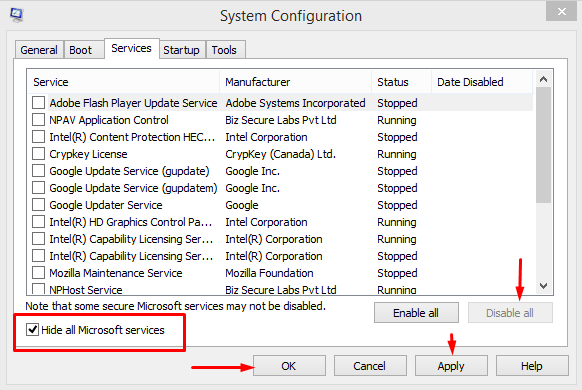
In Windows 10, Tiworker.exe using high CPU memory stems from overloaded functioning of new programs. You can reset your computer to default Windows program.
This method, known as clean booting, can restore the Windows services only. You reload the default Windows programs and your computer runs like a new one.
To clean-boot the PC,
- Open the Run dialog box by hold-pressing Windows and ‘ R ’ keys
- In the dialog box, type “ msconfig ”
- Click on OK
- A System Configuration window opens up
- In the window, choose Services tab
- Tick the checkbox for – Hide all Microsoft services
- Click on the Disable all button
- Click on OK and then on Apply to save the changes
You’ll see a prompt asking you to restart the computer. Click on OK to restart the computer. Check how it lowers Tiworker.exe’s CPU usage.
The only downside to clean booting your PC – you’ll have to download non-Windows program manually after restarting.
Make sure you don’t install programs that result in Tiworker.exe’s high memory usage.
Similar articles
When you see the dns_probe_finished_no_internet error in Google Chrome, it means that your computer no longer connected to the internet. Here are some easy fixes for the DNS Probe Finished No Internet error.
What to do when the Razer Synapse software suddenly stops working on your Windows PC? Rezer synapse not working is a common problem reported by users. Let's see easy methods on getting your Razer Synapse start working again.
If you’re stuck with any issue on your Windows 10 PC, and want to get a help, there are several ways to do that. Here we'll disucss the best ways for getting help in a Windows 10 computer.
You need to properly maintain your laptop to keep it running at the best level. Here are 10 guidelines on how to properly maintain your laptop.
System Configuration allows you to make customizations to your Windows settings. In this guide, we will be discussing all the possible ways to open the System Configuration tool or msconfig.exe in all Windows versions.
Windows 10 has faced several complaints from users regarding some high CPU usage. Windows Shell Experience Host is one of the main reasons causing this problem.Being new to the working of Windows 10 OS, you need to know how to fix this issue and prevent the Windows Shell Experience Host from using too much memory.