Picture this! You have one of the sassiest Bluetooth headphones filled with exciting features like noise canceling, long-lasting battery, and compatibility with smartphones, Android, and iPhone.
And, you are super excited to tune in to your favorite songs to enjoy the ultimate sound experience. But, you find that your headphones are not working on Windows 10.
Your new Bluetooth headphones not working can be really annoying. And, if you are wondering how to fix the headphones not working on Windows 10 PC, then keep reading to find out some reliable solutions.
Windows 10 Headphones Not Working [Fixed]
Let’s take a look at some easy steps to fix the headphone issues on Windows 10.
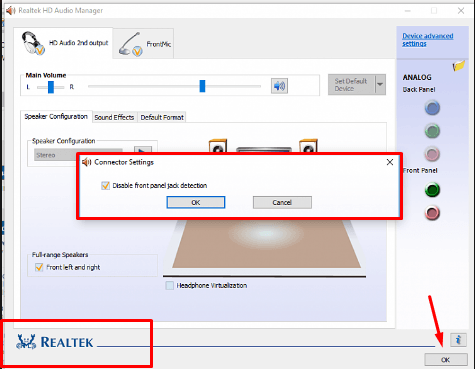
Solution #1: Try Disable front panel jack detection
Quick Tip: Try this method, if you have Realtek HD Audio software installed on your PC or laptop.
One of the causes of Bluetooth headphones not working can be attributed to Realtek audio. So, to resolve the error, try this step-by-step method.
- Hold Windows key + press R .
- Key in Control Panel and hit Enter .
- Select Hardware and Sound .
- Locate Realtek HD Audio Manager anrd click it.
- Go to the Connector
- Check the ‘Disable front panel jack detection ‘ by clicking it.
- Click Ok .
Now, check if the error is resolved.
Solution #2: Enable the Bluetooth Support Service on Windows 10 PC
Are you wondering - how do I enable headphones in Windows 10? Then, this solution will help.
-
- Hold Windows key + press R .
- Type in Services.msc and hit Enter .
- Find the Bluetooth support services and double-click the entry.
- On the General tab, select the Startup type as ‘ Manual ‘ and the Service status as ‘ Start ‘.
- Click Ok and next Apply .
Now, check if the problem still persists.
Solution #3: Try Setting Headphones as the Default Playback Device
Few users who’ve come across the headphones not detected on Windows 10 error have reported success with this solution. Try the following steps:
- Hold Windows key + press R .
- Key in Control Panel and hit Enter .
- Go to Hardware and Sound and select Sound .
- In the Sound window that appears, on the Playback tab, right-click in the window.
- Choose Show Disabled Devices .
- Next, right-click the apt headphone device settings (from a list of headphones that appears) and choose Enable .
- Now, select Set as Default and click Apply .
You may now try checking the headphones.
Solution #4: Try Automatically Updating Sound Drivers
Next, this is another solution worth a try. Here’s what you need to do:
-
- Right click on the Speaker/Sound
- Select Sounds and go to the Playback
- Choose your Speakers/Headphones .
- Next, click on Properties .
- Locate Controller Information and click the button called Properties.
- Click on Change Settings .
Note: This will need Administrative permissions.
- Next, go to the Driver tab and choose Update Driver .
- Allow the automatic download.
Now, check if the headphones are working.
Quick Tip: You may choose to restart and check.
Solution #5: Try Updating Sound Drivers Manually
Here’s another solution:
-
- Hold Windows key + press R .
- Key in hdwwiz.cpl and click Ok.
- On the Device Manager window that appears, go to Sound, video and game controllers and right click on High Definition Audio Device .
- Next, select Properties from the pull-down menu.
- Now, go to the Driver tab in High Definition Audio Device Properties and click on Update Driver .
- Select Browse my computer for driver software .
- Next, select Let me pick from a list of device drivers on my computer .
- Select the High Definition Audio Device .
- Click Next and then Yes to the Update Driver Warning .
Now, you may restart your computer and check if the problem is resolved.
Solution #6 Update Sound Drivers using a Free Application
In the context of updating sound/audio drivers, you may also try using a professional (and free) application like Driver Talent. The application is designed to help you get the drivers required for your Windows PC. Try the following steps:
- Download and Install Driver Talent .
- Click Scan .
- Next, choose ‘Update’ or ‘Download’ and install the relevant sound drivers.
Quick Tip: Remember to backup your sound/audio drivers, which enable you to access previous drivers whenever you need.
- Restart your PC.
Now, check if the updated sound drivers have resolved the error or not.
Solution #7: Change default sound format
One of the myriad reasons why the headphones are not detected on Windows 10, is the sound format. So, here’s how you can change the default sound format:
- Hold Windows key + press R .
- Key in Control Panel and click Ok .
- Click Hardware and Sound .
- Select Sound .
- On the Playback tab, double-click on the Default Playback device .
- Go to Advanced
- And, change the default sound format from the drop-down menu.
Now, check if the issue is resolved.
Solution #8: Try Rebooting
A basic method is to try rebooting the PC.
- Press the Windows button.
- Click the Power Button.
- Choose Restart/Update and restart.
Solution #9: Try Restoring Your PC
Another solution is to try resting the system. Here’s how you can do it:
- Click on the Start button and key in restore point .
- Next, click on Create a restore point .
- Go to System Protection tab, and click System Restore .
- Choose the Restore Point that is created recently. And, follow the prompted steps.
Note: Remember to back up the data on your PC before trying a system restore.
Finally, the next time you find that your Bluetooth headphones are not working, try the step-by-step solutions. Find the error fixed quickly, and get back to enjoying your favorite songs, movies, or games.
Read Next:
- Easy Fixes for “Microphone Not Working” Problem on Windows 10
- Windows 10 Start Menu Not Working or Won’t Open At All [Fixed]
- How to Fix Windows Key Not Working in Windows 10