Steam is a top-notch online gaming portal. Millions of PC gamers are hooked on Steam worldwide. And, the main reason for that is Steam’s remarkable trait – not having many errors.
If you’re a PC gamer who loves using Steam, you’ll agree to how there’s not many errors you encounter on it. Steam games and desktop clients are immaculate.
But, sometimes, there are a few errors that pop up on your Steam desktop app. For those, a golden command called steam://flushconfig saves you from any ordeal.
Here’s a guide on how to use steam://flushconfig command on Windows and keep things running on your Steam app.
What Is Steam://Flushconfig?
For the times when Steam misbehaves, you can use the steam://flushconfig command to sort things out. In Windows 10, the steam://flushconfig command is used with Run application.
It is a command responsible for flushing out all configurations on your Steam app. Like other Run commands, the steam://flushconfig command directs an open application (here, Steam) to reconfigure itself back to default settings.
What Does Steam://Flushconfig Do?
The steam://flushconfig command allows you to flush the configurations of your Steam account. You can get rid of any and all misconfigurations by executing the steam://flushconfig command.
The steam://flushconfig command lets you –
- refresh Steam files
- clear download caches
- free up space on your Steam Client app
- reset your Steam game data, and
- update the Steam app
You can execute the steam://flushconfig command and bring things back to default. It helps you out in many ways.
You can avoid manually changing the Steam settings. With this command, you reset Steam settings in one go.
You can also override your gaming preferences. The steam://flushconfig command lets you flush out settings on Steam games. As a result, your performance in the particular Steam game improves.
There’s another advantage of using steam://flushconfig command on Windows 10. You can remove the unwanted temp files to free up space on your Steam Client app.
It helps you run Steam games smoothly, without any delay. Further, you can store more game data once you clear out caches with the steam://flushconfig command.
How To Use Steam://Flushconfig On Windows 10 ?
Each operating system has a different way of executing the steam://flushconfig command. For Windows 10, using the steam://flushconfig command is simple.
To run steam://flushconfig ,
- Firstly, close the Steam desktop client
- Close all other apps running in the background
- Now, right-click on your Windows 10 taskbar
- Here, select the ‘ Task Manager ’ option from the context menu
- Open the tab for ‘ Details ’ in the Task Manager window
- Locate all Steam-related processes
- Right-click on each one of them, and select End Process tab
After kill active Steam processes, you move on to running the steam://flushconfig command.
- Press-hold the ‘ Windows ’ key and hit the ‘ R ’ key
- It opens the Run program
- Type - steam://flushconfig – in the Open dialog box
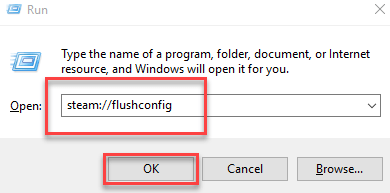
- Click on OK
Now, wait for a couple of minutes. Restart your computer. You go to C: drive and open Steam’s installation folder ( C:/Programs/Steam ). Here, find the ‘Steam.exe’ file and double-click on it.
Now you know how to run the steam://flushconfig command. You can follow these steps to restart configurations of Steam Client.
Running this command helps you resolve any possible errors on your Steam app. This way, you can avoid reinstalling Steam again and again.
How To Restore Steam Games After Running Steam://Flushconfig Command?
Steam users, however, are a bit skeptical about using the steam://flushconfig command. In Windows 10, the steam://flushconfig command clears out all the downloaded Steam games as well.
For this reason, steam://flushconfig command is less-used by gamers.
Luckily, there’s an easy way out of this fallout. You can restore the download games to Steam in some easy steps.
After running the steam://flushconfig command,
- Open the Steam app
- Go to the Settings dashboard
- Select the Downloads section (left pane)
- Now, click on Steam Library Folders
- Select the default folder where stored all the previous Steam games
- Click on ‘ ADD LIBRARY FOLDER ’ tab
You’ve successfully restored all Steam games to your desktop client application. Now, you can resume to game with Steam on your Windows 10 desktop.
Was this article helpful? Let us know in the comments below. Also, share your Steam experience so we can help you resolve more issues going forward.
Read Next:
- How to Fix Steam Missing File Privileges Error in Windows 10?
- How to Fix Steam Stuck on “Preparing to Launch”?
- Why is Steam Not Opening on My PC? How to Fix it?
Krook
September 24, 2018 at 1:01 pmThanks for sharing the exact work, and now I am able to use “Steam://Flushconfig” command.
Thanks Again.