Windows Audio Graph Device Isolation or the AudioDG.exe file is a process that controls all sound enhancements in your Windows 10/8/7/.
Unfortunately, due to some reasons, the AudioDG.exe file may consume high CPU and disk memory while running.
Has your Windows Audio Device Graph Isolation stopped working? Here’s how you can lower the high CPU usage of AudioDG.exe file.
1. Restore Your Audio Driver
First, you need to uninstall your audio adapter software. This solution is more effective in reducing the AudioDG.exe file’s high CPU usage.
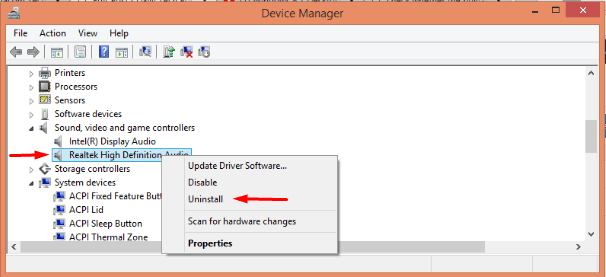
- Go to the Start menu and type “ Device Manager ” in the search box
- Press the Enter key and double-click on the Device Manager program from the search list
- In the Device Manager window , expand the section for Sound, Video and Game Controllers
- Locate the sound card in the list
- Right-click on it and select Uninstall from the dropdown menu
- You’ll get a pop-up – User Access Control
- Put a tick in the checkbox next to – Delete the driver software from this device
- Click OK to save the changes
- Reboot your computer
Once rebooted, you need to restart your PC and go to the Downloads folder. Locate the audio drivers, right-click on them and select “ Run as Administrator ” option.
Now, you’ve reinstalled the audio drivers in your computer. The “Windows Audio Device Graph Isolation stopped working” problem is fixed.
2. Check For Virus
Most probably, the problem stems from a malware or a virus in your computer. The virus could’ve relocated the AudioDG.exe file and caused high CPU and memory usage.
You need to check the location of the AudioDG.exe file. If it is located in the C: drive under Windows\\System 32, then everything is normal.
To check AudioDG.exe file’s location,
Open Task Manager on your Windows 10/8/7 (Shortcut keys – Ctrl + Alt + Del)
Under the Processes tab, you’ll see the list of programs currently running on your computer
Find the AudioDG.exe process in the list or an entry for Windows Audio Device Graph Isolation
Right-click on it and select “Open file location” from the dropdown menu
Check if the location of AudioDG.exe file is C:\\Windows\\System32. Relocate the file to this address if it is placed in some different folder.
3. Disable All Sound Effects
Your last resort should be turning off all the sound effects. If none of the above ways lower the high CPU usage of AudioDG.exe, you can go for this method.
There’s a good chance that due to some sound effects, your Windows Audio Device Graph Isolation stopped working.
However, you can’t figure out which sound effect is causing the Windows Audio Device Graph Isolation’s high CPU usage.
You need to turn off all sound effects.
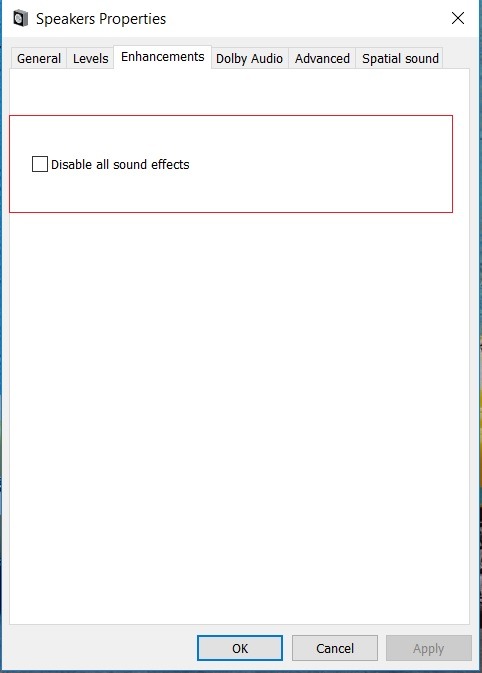
- Go to the Speakers icon on your Windows 10 desktop taskbar
- Right-click on the icon to open the window
- Select the Playback Devices option and click on it
- Go to the Playback tab, and under it, find Speakers option
- Right-click on it and select “ Properties ” from the dropdown menu
- Open the Enhancements tab in the Properties window
- Click on the checkbox next to – Disable all sound effects
- Click on OK to save changes
You can certainly fix the “Windows Audio Graph Device Isolation using high memory” problem by disabling the sound effects.